
This section covers creating e-mail accounts, setting a catch-all address, mail forwarding, autoresponders, vacation messages, mailing lists, filters, tracking and altering MX records.
- Creating E-Mail Accounts
- Changing E-Mail Account Passwords
- Deleting E-Mail Accounts
- SMTP Authentication
- Setting a catch-all Address
- Forwarders
- Modifying / Deleting Forwarders
- Autoresponders
- Modifying / Deleting Autoresponders
- Vacation Messages
- Modifying / Deleting Vacation Messages
- Webmail: Roundcube
#Creating E-Mail Accounts
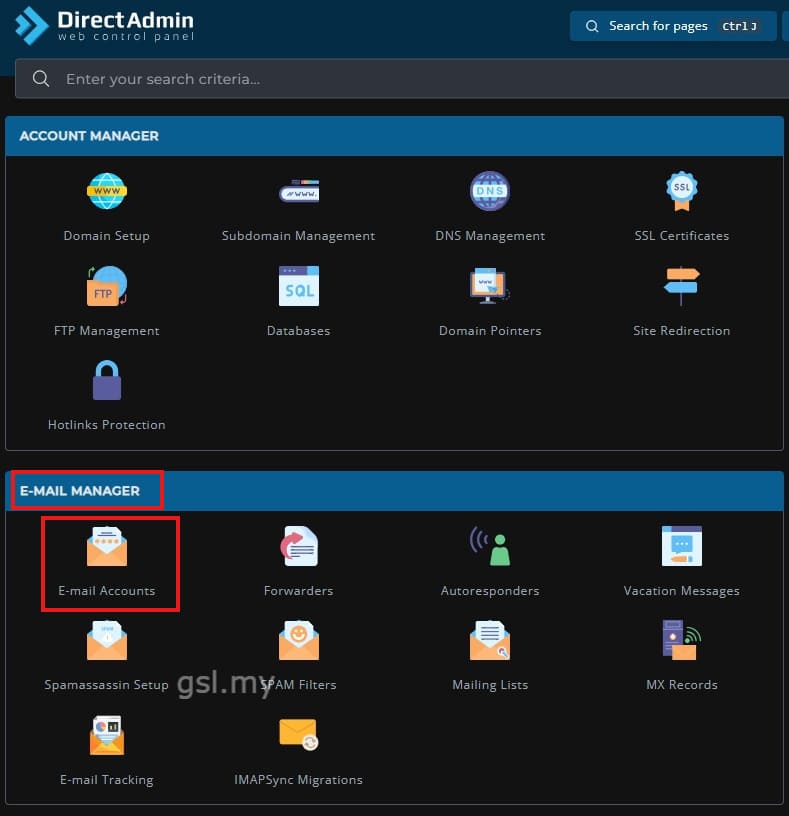
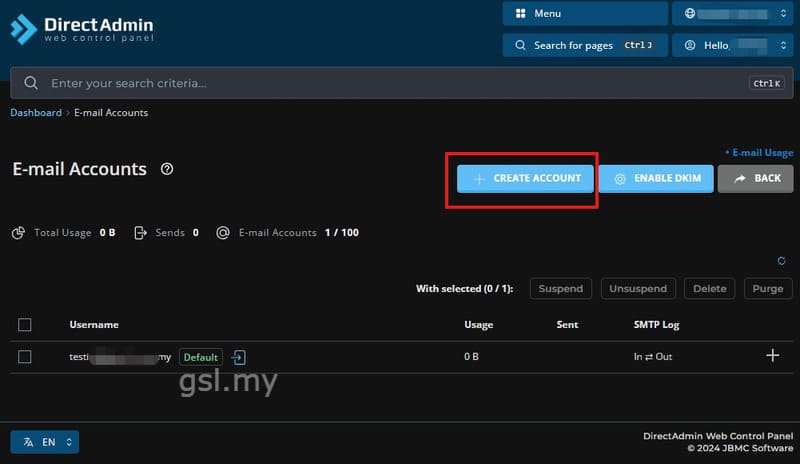
To create an e-mail account, sign into the control panel and then click on the “E-Mail Manager” icon, followed by the “E-Mail Accounts” link. You will notice one e-mail account already exists: username@yourdomain.com (where “username” is the control panel sign in name). This account is permanent and cannot be deleted.
To create a new mail account, click on “Create Account.” You will see the following box:
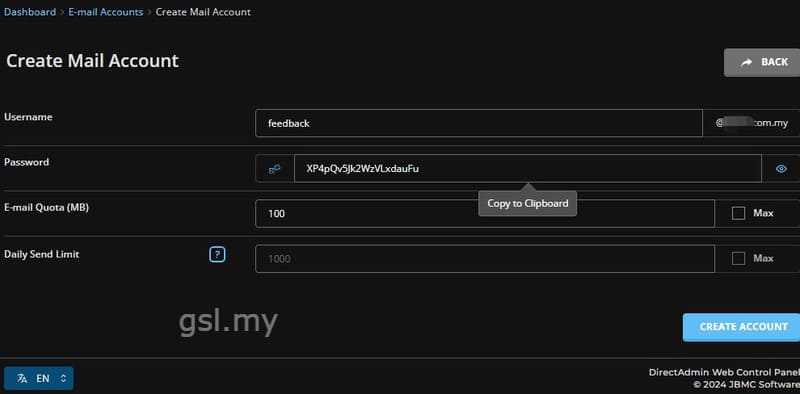
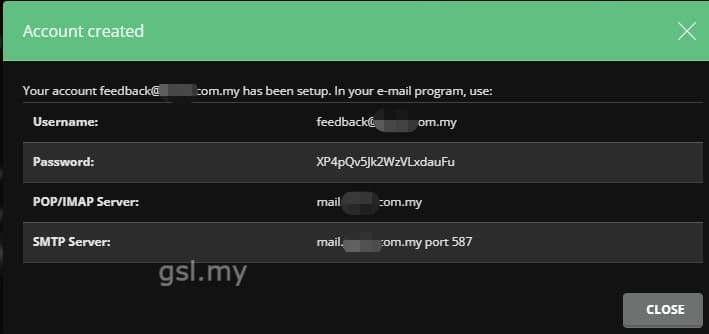
Enter a username and password. Then click “Create.” The control panel will then return a page that looks like:
Note: You cannot create e-mail account if the username is taken by an autoresponder, forwarder, or mailing list.
Changing E-Mail Account Passwords
To change the password of an e-mail account first access the “E-Mail Accounts” menu. Next, click the “+” symbol (in the right corner of e-mail address).
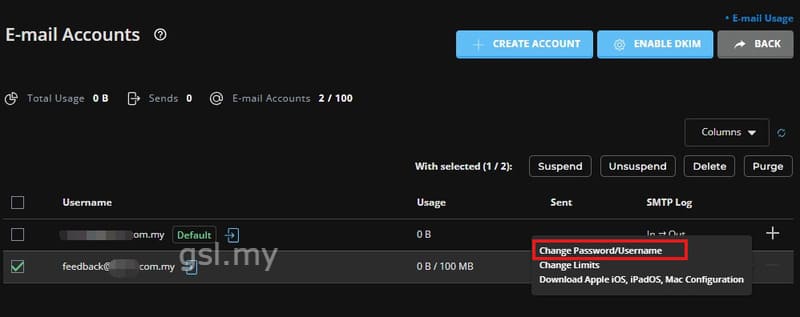
Deleting E-Mail Accounts
To delete an e-mail account first access the “E-Mail Accounts” menu. Next, check the box beside the account(s) you wish to delete and press “Delete” button (top black bar).
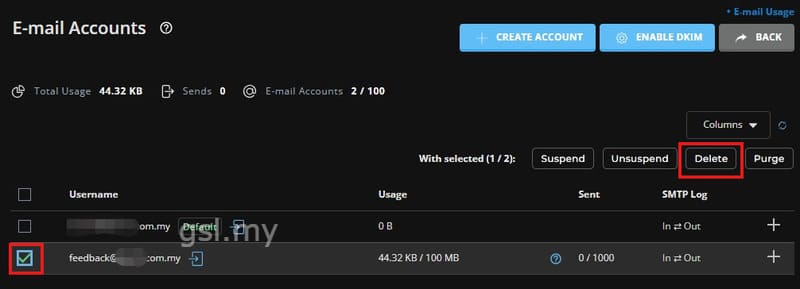
SMTP Authentication
When setting up e-mail account(s) in your e-mail software, you will need to enable SMTP authentication if you choose to use your hosting account for sending mail (instead of using your ISP’s mail server).
The SMTP authorization login name / password is the same as your POP/imap account login name / password (see created account info picture).
Setting a catch-all Address
Note: “Catch-all” feature is disabled to user by default. If it’s disabled, ask your administrator to enable it.
When The server receives e-mail to addresses that don’t exist, it has to do something with those messages. The control panel gives you three options:
- Server deletes message and notifies sender that the address doesn’t exist.
- Server deletes message without notifying sender.
- Server forwards the message to a valid e-mail address.
To choose between these options, first access the “Advanced Features” from the control panel. Then, click the “Catch-All E-Mail” link. You will see something like this:
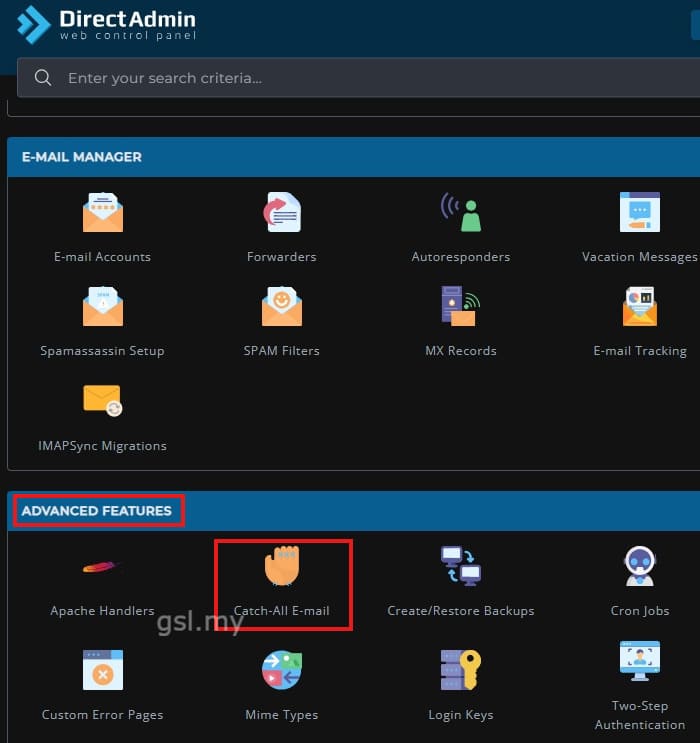
Choose the desired option and click “Save.”
Note: Do NOT choose “Ignore:” option unless you know what you are doing. Abusing “Ignore:” option can slow down your server.
Forwarders
Note: “Forvarders” feature is disabled to user by default. If it’s disabled, ask your administrator to enable it.
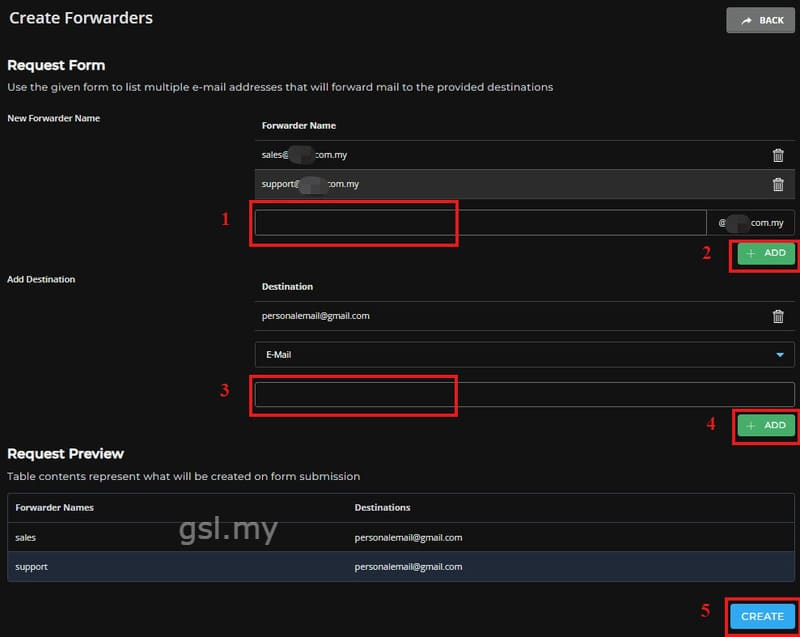
Forwarders allow you to direct incoming mail to a different address. For example, assume you wanted e-mail sent to support@yourdomain.com and sales@yourdomain.com to arrive at the account customerservice@yourdomain.com. You can create two forwarders that will let you do this.
To create a forwarder, first access the “E-Mail Manager” from the control panel. Next, click on the “Forwarders” link and then click the “Create E-mail Forwarder” button at the top of the page. You will see a box like this:
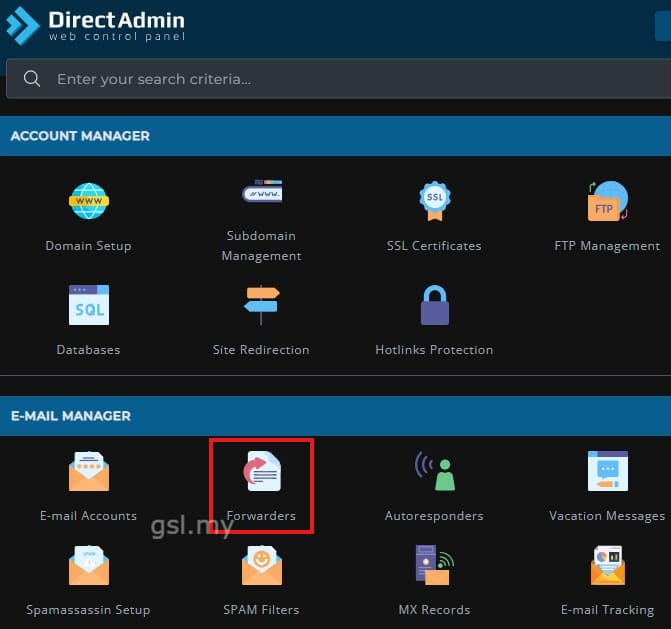
Enter the forwarder name, destination address, and then click the “Create” button. Note you can forward to multiple address by simply pressing “+” button at the left corner of first forwarder name.
Other valid forward values are:
- :fail: will return a failed message to the sender.
- :blackhole: will accept the email and discard it.
- :pipe: is used to deliver messages via a pipe to a command running in another process. One example is the use of pipe as a pseudo-remote transport for passing messages to some other delivery mechanism. Another is the use by individual users to automatically process their incoming messages.
example, from the forum article:
"|/usr/local/bin/php -q /home/[USER]/domains/[DOMAIN]/public_html/osticket/api/pipe.php"
Modifying / Deleting Forwarders
All forwarders are listed in the forwarders menu. To delete a forwarder, check the box(es) left of the forwarder name(s) and then click the “Delete” button.
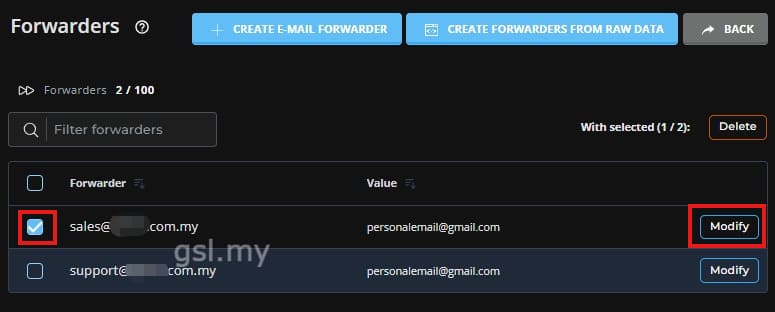
A forwarder can be modified by clicking the “Modify” button left to the forwarder address. The modify feature allows you to change the destination e-mail address but not the forwarder name.
Autoresponders
Autoresponders are e-mail robots that reply to all incoming messages with a standard outgoing message. The autoresponder will reply to all messages received, regardless of their content. For example, some companies keep updated price lists on an autoresponder. Potential customers would e-mail pricelist@domain.com and they would receive the price list in their e-mail inbox within moments.
To create an autoresponder, first access the “E-Mail Manager” from the control panel. Then, click the “Autoresponders” link and then the “Create Autoresponder” button.
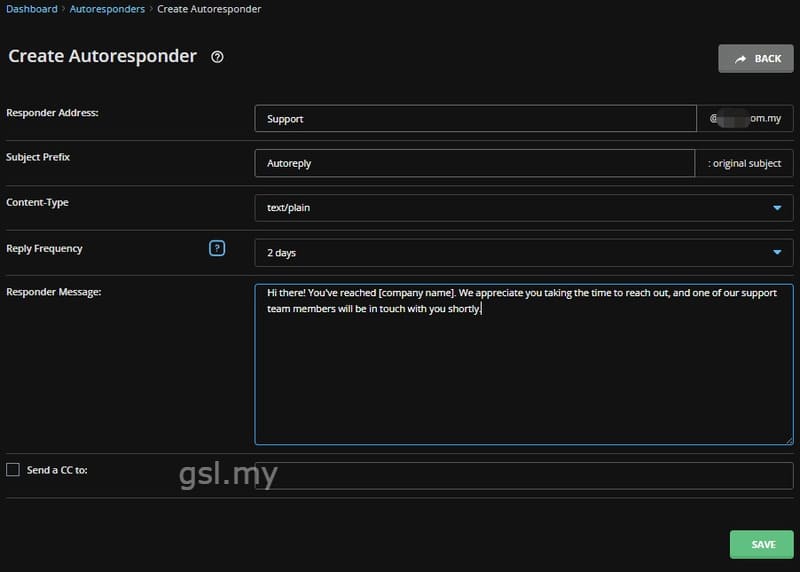
First, choose an autoresponder name.
Second, enter the autoresponder message in the text box. You may NOT include HTML tags.
Third, you may optionally enter a CC address. This will send a copy of each autoresponder output to the address specified in the text box. Enabling the CC feature allows you to monitor how many requests your autoresponder receives.
- Note: You must have e-mail account or a forwarder associated with the autoresponder.
- If you wish to save a copy of the incoming email, then create e-mail account with the same name as the autoresponder.
- If you wish to discard the incoming email, and only send the reply, then you would need to create a forwarder with the same name, and forward the email to :blackhole:.
- Failure to create a forwarder or pop account along with the autoresponder, will result in a failed message being sent to the sender, on top of the autoreply email.
Modifying / Deleting Autoresponders
All autoresponders are listed in the autoresponder menu. To delete an autoresponder, check the box next to the autoresponder name and click the “Delete” button.
To modify an autoresponder, click the “modify” link right to the autoresponder name. The modify feature allows you to change the autoresponder message and CC: address. When you are finished, click the “Create” button.
Vacation Messages
Vacation messages tell others that you are away. A common vacation message may sound like: “I have received your e-mail message but I am away on vacation until June 21. I will respond to it then.” Vacation messages are used in conjunction with already existing e-mail accounts.
To create a vacation message, first access the “E-Mail Manager” from the control panel. Then, click the “Vacation Messages” link and then the “Set Vacation Message” button.
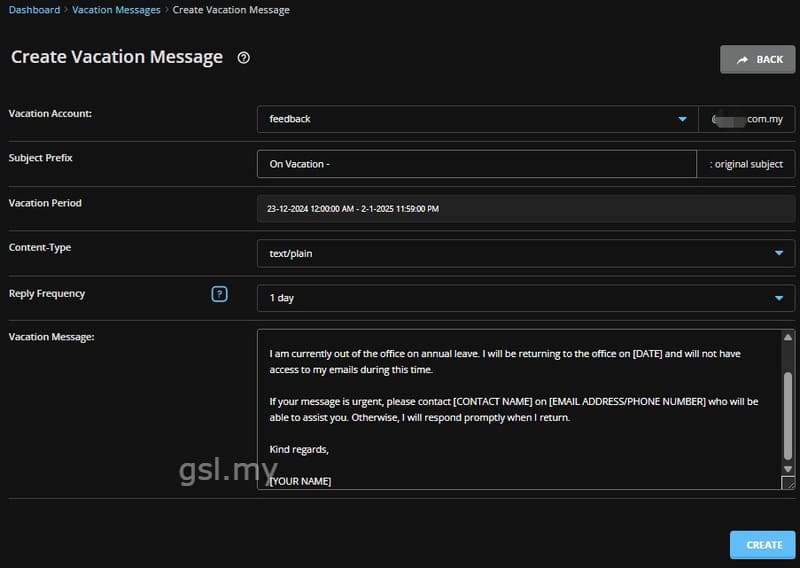
First, select the account you want to add a vacation message to. Second, select when the vacation message will take effect and when it will stop taking effect. Third, enter the vacation message. Fourth, click the “Create” button.
Modifying / Deleting Vacation Messages
All vacation messages are listed in the vacation messages menu. To completely delete a vacation message, click on the checkbox next to the vacation account and click “Delete.”
A vacation message may be modified by clicking on the “modify” link next to the vacation account. The modify feature allows you to change the message text, vacation start time, and vacation end time.
Webmail: Roundcube
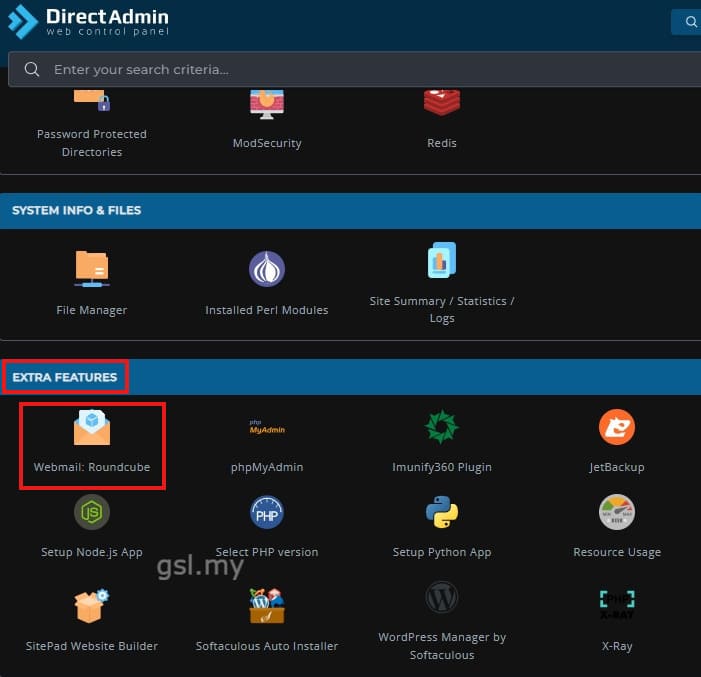
To access webmail, click the “Extra Features” link in the main control panel menu, then click the “Webmail:Roundcube” link.
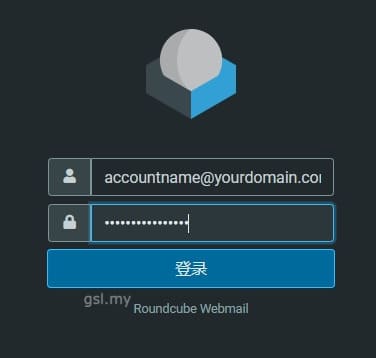
First, enter your full e-mail address in the “E-mail” field. Then, enter your password. Click the “Login” button.
Important: To sign in with your default e-mail address (control-panel-username@yourdomain.com), do not add @yourdomain.com to the webmail login name. For example, if you log into the control panel with the user “gary” , then use only “gary” (without the quotes) to sign into webmail. All other mail accounts must sign in with accountname@yourdomain.com.
Note: For advanced SPAM filtering we suggest you to use SpamAsssasin. To enable SpamAssassin simply select “E-Mail Manager” from Control Panel, then click “SpamAssasin” Setup link and press “Enable SpamAssasin” button.
You will see detailed selection menu, which will ask you how to behave with spam mails and what threshold of the spam should be.